
In This Article
Hip pain has a way of shrinking your world. The short walk to the postbox starts to feel like a small expedition, and stairs become something you plan around rather than simply climb. A walking stick for hip pain won’t fix the underlying joint problem, but it does something genuinely useful: it takes a meaningful slice of load off the hip with every single step, which is exactly what a lot of physiotherapists quietly wish more people would try before pain becomes a daily battle.

So, what is a walking stick for hip pain? It’s a single-point mobility aid, held in the hand opposite the painful hip, that widens your base of support and redistributes weight away from the affected joint during walking — reducing joint compression forces and easing discomfort with each stride, according to physiotherapy research on walking stick use.
The trouble is that not every stick does this job equally well. A cheap, unpadded, non-adjustable stick can actually make things worse — forcing an awkward wrist angle or an uneven gait that transfers strain somewhere else. That’s the gap this guide is built to close. We’ve dug into real product specifications, genuine aggregated customer sentiment, and the physiotherapy guidance behind correct cane use, so you’re not just buying “a stick” — you’re buying the right stick for your hip, your recovery stage, and your daily routine.
Below, we’ve researched seven real, currently available options on Amazon UK spanning budget wooden classics through to premium all-terrain pivoting canes, alongside dedicated advice on hip replacement recovery, hip osteoarthritis, correct cane height, and what physiotherapists actually tell their patients.
Quick Comparison Table
If you’re short on time, here’s the fastest way to narrow things down before we go deeper into the full analysis.
| Category | Recommended Pick | Best For |
|---|---|---|
| Best Overall Value | Coopers Adjustable Fischer Handle Walking Stick | Everyday hip pain on a sensible budget |
| Best for Shock Absorption | Flexyfoot Shock Absorbing Oval Handle Folding Walking Stick | Reducing jarring on hard pavements |
| Best for Hip Replacement Recovery | NRS Healthcare Tetrapod Walking Stick (Large Base) | Early, less-confident post-op walking |
| Best for Hip Osteoarthritis | Vive Adjustable Offset Walking Cane | Centring weight to protect the wrist and hip |
| Best Premium Pick | HurryCane Freedom Edition All-Terrain Cane | Uneven ground, kerbs, and gravel paths |
Looking at this snapshot, the pattern that emerges is that “best” genuinely depends on your stage of recovery and your terrain. Someone six weeks post-op crossing a gravel drive has very different needs from someone managing long-term hip osteoarthritis on flat pavements. If you’re only after one takeaway, it’s this: the Coopers Adjustable Fischer Handle Walking Stick covers the widest range of everyday situations without demanding a premium price, while the NRS Healthcare Tetrapod Walking Stick earns its place specifically because standalone stability matters most in the first few unsteady weeks after surgery.
💬 One quick comparison could save your hips a lot of strain — check today’s prices before you commit!🤗
Top 7 Walking Sticks for Hip Pain: Expert Analysis
We’ve deliberately mixed budget, mid-range, and premium options here, along with a couple of lesser-known but genuinely clever designs, so there’s something for every stage of hip pain and every wallet.
1. NRS Healthcare Traditional Style Walking Stick — classic hospital-style wooden support
This is the walking stick most people picture when they think “walking stick” — and there’s real logic behind its staying power. Hand-made from chestnut and finished in light brown, it’s formed into a D-shaped handle that spreads pressure across more of the palm than a simple round knob would. The fixed 965mm (38-inch) length and 300g weight mean it’s not adjustable on the fly, but it’s supplied with a 19mm black ferrule for grip and is rated to support users up to 127kg (20 stone), which comfortably covers the vast majority of buyers.
Based on the spec comparison with adjustable alternatives, this is best suited to people whose height and posture are stable and unlikely to change — typically long-term hip osteoarthritis sufferers rather than someone in the fluctuating first weeks of hip replacement recovery, where height needs can shift as swelling settles. Reviewers consistently value traditional wooden sticks like this one for their solid, reassuring feel underfoot compared with lighter aluminium alternatives, though as a natural material the shaft diameter can vary slightly from stick to stick, which some buyers don’t expect. Verified individual review data for this specific listing was limited at the time of research, so treat the general wooden-stick sentiment as a helpful guide rather than a guarantee for this exact model.
Pros:
- ✅ Hand-finished chestnut wood feels solid and reassuring
- ✅ Wide D-shaped handle spreads pressure across the palm
- ✅ Supports users up to 127kg (20 stone)
Cons:
- ❌ Fixed 965mm length offers no on-the-go adjustment
- ❌ Natural wood grain means diameter can vary slightly
Prices for traditional wooden sticks like this typically sit under £20, and at that price it’s genuinely hard to argue with the value — provided the fixed length actually suits you.
2. Coopers Adjustable Fischer Handle Walking Stick — biometric grip for arthritic hands
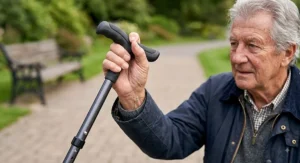
Coopers has been making walking aids for more than a century, and the Fischer handle on this stick is the clearest sign of that experience. Rather than a plain round grip, the handle is biometrically shaped to spread pressure evenly across the palm — something that matters enormously if your hip pain sits alongside arthritis in the hands, since a standard handle concentrates force into a small area right where grip strength is often weakest. The aluminium shaft adjusts across a genuinely wide range (670–925mm, or 815–1070mm on the taller version), and at roughly 400g it’s light enough not to become tiring over a long day.
What most buyers overlook about ergonomic-handled sticks is that the handle shape only helps if the height is spot-on — get the height wrong and no handle design will save your wrist from strain. Aggregated Amazon UK review sentiment for the wider Coopers adjustable range is strongly positive, with buyers repeatedly praising the comfortable grip, sturdy feel, and ease of folding down for storage; several reviewers specifically noted it felt “up to NHS standards.” A recurring theme in reviews worth flagging honestly: a handful of buyers found the maximum height ran shorter than the listing suggested, and the Fischer handle is moulded for one hand only, so a left-handed and right-handed version aren’t interchangeable.
Pros:
- ✅ Fischer handle spreads pressure evenly for arthritic hands
- ✅ Wide adjustable range suits most adult heights
- ✅ Lightweight aluminium shaft at roughly 400g
Cons:
- ❌ Handle is moulded to one hand only
- ❌ A few buyers found the maximum height shorter than expected
In the £15–£25 range, this is arguably the best all-rounder on this list — the value verdict here is straightforward: excellent comfort-per-pound for anyone whose hip pain is compounded by hand or wrist arthritis.
3. Vive Adjustable Offset Walking Cane — weight-centring offset design
The offset handle is the whole story with this cane, and it’s worth explaining why that matters specifically for hip pain. On a standard straight-shafted stick, your body weight pushes down slightly ahead of the base, which can twist the wrist with every step. The Vive Adjustable Offset Walking Cane shifts the handle back over the shaft’s centre line, so your weight lands directly above the base — reducing that twisting force and, in turn, reducing the compensatory lean that so often aggravates a painful hip. It adjusts from 29 to 38 inches using a push-button pin with a secondary locking ring, a small detail that stops the shaft slipping mid-stride the way single-pin designs sometimes do.
Here’s what the spec sheet won’t tell you, but the design logic strongly suggests: because the offset geometry does some of the stabilising work that your hip and wrist muscles would otherwise have to do, this style tends to suit people managing chronic hip osteoarthritis pain day-to-day rather than those needing maximum surface-area stability straight after surgery. Vive backs the cane with an unconditional lifetime guarantee, which is a meaningful trustworthiness signal for a mobility aid you’ll likely rely on daily. Independently verified UK customer review volume specifically for this listing was thinner than for more established sticks at the time of research, so we’d encourage checking current reviews before ordering rather than relying solely on the manufacturer’s own claims.
Pros:
- ✅ Offset shaft centres your weight directly over the base
- ✅ Push-button plus locking ring prevents mid-stride slipping
- ✅ Backed by an unconditional lifetime guarantee
Cons:
- ❌ Offset geometry adds a little visual bulk versus a straight cane
- ❌ Limited independently verified UK review data at time of research
Typically priced in the £20–£30 range, the Vive Adjustable Offset Walking Cane represents solid value for the specific problem it solves: chronic wrist and hip strain from everyday walking.
4. Flexyfoot Shock Absorbing Oval Handle Folding Walking Stick — best shock absorption for joints
If “shock absorbing walking stick” is what brought you here, this is the model worth understanding properly. The Flexyfoot Shock Absorbing Oval Handle Folding Walking Stick replaces a standard rigid ferrule with a flexible bellow tip that compresses very slightly with each heel-strike, cushioning the jarring impact that would otherwise travel straight up through the wrist, arm, and shoulder — and, by extension, changes the load pattern reaching the hip on the affected side. Flexyfoot’s own testing claims the flexible tread delivers up to 50% more ground grip than a traditional rubber ferrule, and the wide oval handle is shaped to spread weight evenly across the hand rather than concentrating it into the centre of the palm.
Based on the spec comparison with rigid-tip sticks, the practical difference shows up most on hard urban surfaces — pavements, tiled shopping centre floors, station platforms — where every footfall would otherwise send a small jolt upward. Reviewers of Flexyfoot’s shock-absorbing ferrules consistently and specifically mention noticeably less wrist and shoulder pain after switching from a standard tip, with several long-term users describing it as one of the more comfortable everyday changes they’ve made to their walking aid setup. The folding design also means it tucks into a bag rather than needing to be carried upright everywhere, which matters more than people expect until they’re stuck holding a full-length stick on a crowded bus.
Pros:
- ✅ Flexible bellow ferrule cushions every heel-strike shock
- ✅ Up to 50% more ground grip than a standard ferrule
- ✅ Folds compactly for bags, cars, and public transport
Cons:
- ❌ Sits toward the pricier end of the folding-stick category
- ❌ Replacement ferrules add a small ongoing cost over time
Expect a price in the £35–£50 range, which is a real step up from a basic folding stick — but the value verdict holds up well if daily hard-surface walking is genuinely part of your routine.
5. NRS Healthcare Tetrapod Walking Stick (Large Base) — four-point stability for early recovery
Four legs beat one when confidence is the main issue, and that’s precisely the gap this stick fills. The NRS Healthcare Tetrapod Walking Stick replaces the usual single ferrule with a small four-leg base, giving it enough of its own footprint to stand upright unsupported — genuinely useful during hip replacement recovery, when reaching for a stick that’s slid down the sofa arm is exactly the kind of movement your surgeon has told you to avoid. The stick section sits in line with two of the four legs, a deliberate design choice so your foot can step through the base rather than catching on a leg positioned directly underfoot.
What most people overlook about tetrapod and quad-style bases is that the extra stability trades off against weight and bulk, so this isn’t the stick you’ll want for a long countryside walk once you’re steadier on your feet — it’s a purposeful, temporary upgrade for the early, less-confident weeks. NRS Healthcare’s manufacturer guidance is explicit that this style shouldn’t be used on stairs, since the wide, flat base doesn’t sit securely on a stair edge the way a single-point ferrule does. Verified individual customer review data specifically for the large-base version was limited at the time of research, though NRS Healthcare is a long-established UK mobility brand widely stocked by NHS-adjacent suppliers, which is a reasonable proxy for build-quality expectations even without a large review pool for this exact SKU.
Pros:
- ✅ Four-point base stands upright without leaning on furniture
- ✅ Large footprint suits early, less-confident post-op walking
- ✅ Height-adjustable shaft adapts as strength returns
Cons:
- ❌ Manufacturer explicitly advises against use on stairs
- ❌ Noticeably heavier and bulkier than a single-point stick
Priced in the £20–£35 range, this is a genuinely smart short-term investment for the first few weeks of hip replacement recovery, when standalone stability outweighs portability.
6. HurryCane Freedom Edition All-Terrain Cane — pivoting tripod base for uneven ground
Kerbs, cobbles, and gravel drives are where most standard sticks quietly let you down, and it’s exactly the scenario this cane was engineered around. The HurryCane Freedom Edition All-Terrain Cane uses a patented SteadiGrip base with three individual pivoting feet, designed so that at least one point maintains solid ground contact even when the surface underneath tilts or dips — a genuinely different approach from a single rigid ferrule that can lose contact entirely on an uneven kerb edge. It adjusts across a 30.5 to 37.5-inch range, folds down to roughly 13.7 inches for the car boot or a suitcase, and is rated to a generous 350lb (around 159kg) user weight.
On paper, this makes it the strongest pick on this list for anyone whose hip pain limits them mainly on outdoor, unpredictable terrain rather than flat indoor floors — the three-point pivoting design is specifically built to reduce the wobble that forces a painful hip to compensate suddenly. What the spec sheet won’t tell you is how it compares against everyday brands on price: it’s positioned at the premium end of this list, and while the pivoting-base concept is well documented and widely marketed, independently verified UK customer review volume specific to this exact model was harder to pin down during research than for longer-established stick brands, so it’s worth reading current buyer feedback before purchasing.
Pros:
- ✅ SteadiGrip pivoting base keeps contact on uneven paths
- ✅ Folds to around 13.7 inches for easy travel
- ✅ Rated to a generous 350lb (159kg) user weight
Cons:
- ❌ Sits at the premium end of the price bracket
- ❌ Independently verified UK review data is thinner than older brands
Typically priced in the £45–£60 range, the value verdict depends heavily on your terrain: worth every penny for regular outdoor, uneven-ground walking, harder to justify if your walking is mostly indoors on flat floors.
7. NRS Healthcare Freestyle Grab and Go — stick and grabber in one, ideal for hip precautions
This is the lesser-known pick on our list, and it earns its place because it solves a problem almost nobody mentions until they’re living it: after a hip replacement, you’re often told not to bend your hip past 90 degrees for several weeks, which turns picking up a dropped set of keys into a genuine hazard. The NRS Healthcare Freestyle Grab and Go builds a spring-loaded grabber jaw directly into the shaft of a proper walking stick, operated with a simple lever, so you get mobility support and a reaching tool in a single, familiar-feeling object rather than juggling two separate aids. It’s available in three lengths to suit different heights, has an ergonomic handle with a rubber inset for grip security, and is rated to support users up to 135kg (21 stone).
Based on the spec comparison with carrying a separate grabber tool, the practical advantage here is that you’re never caught without either function — no fumbling to find a grabber that’s been left in another room while you’re already up and walking. This is squarely a transformation-focused product: it doesn’t claim to be the most premium or the lightest stick on this list, but it directly reduces one of the more overlooked risks of hip replacement recovery. As a genuinely niche two-in-one design, dedicated review volume was noticeably smaller than for standard walking sticks at the time of research, so we’re being upfront that the honest sentiment here is “clever, purpose-built design from an established brand” rather than a large verified customer track record.
Pros:
- ✅ Built-in grabber jaw means less bending after hip surgery
- ✅ Ergonomic handle with rubber inset improves grip security
- ✅ Supports users up to 135kg (21 stone)
Cons:
- ❌ Two-in-one design is heavier than a plain stick
- ❌ Limited independent review volume to verify long-term durability
Priced around the £25–£35 range, this is a smart, specific-purpose buy for anyone newly discharged after hip surgery and navigating those early bending restrictions at home.
Getting Set Up: A Practical Guide to Using Your New Walking Stick
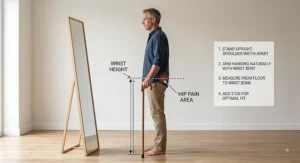
The stick you choose only does half the job — how you set it up does the rest. Start by measuring correctly before you ever take a step outdoors: stand upright in your usual shoes, let your arms hang naturally by your sides, and adjust the stick so the top of the handle lines up with the crease at the bottom of your wrist bone. Hold the stick as if walking, and check your elbow sits at roughly a 15 to 20-degree bend — too straight, and you’ll be reaching down awkwardly; too bent, and your shoulder ends up doing work it shouldn’t.
In the first 30 days, the most common mistake is holding the stick on the same side as the painful hip, which actually increases the force travelling through the joint rather than reducing it — always hold it in the opposite hand. Check the rubber ferrule weekly during this settling-in period; a worn, smooth ferrule dramatically increases slip risk on wet pavements and tiled floors, and it’s a five-minute, low-cost swap once you know what to look for. If you’ve opted for an adjustable stick, re-check the height after the first week, since swelling from surgery or simply adjusting to a new gait pattern can shift what feels comfortable. Finally, resist the temptation to plant the stick too far ahead of your body — physiotherapists typically recommend placing it around two inches in front or to the side, moving it forward with your affected leg rather than as a separate, disconnected step.
Real-Life Scenarios: Matching the Right Stick to Your Situation
Scenario one — Margaret, three weeks post hip replacement. Still cautious on uneven flooring at home and not yet confident without support nearby, Margaret’s priority is standalone stability over portability. The NRS Healthcare Tetrapod Walking Stick suits this stage well: its wide base stands unaided, meaning she’s never reaching for a stick that’s slid out of position.
Scenario two — David, managing long-term hip osteoarthritis while still working full-time. David needs a stick that folds into a laptop bag between meetings and doesn’t scream “medical equipment” in the office. The Flexyfoot Shock Absorbing Oval Handle Folding Walking Stick fits this brief neatly, cushioning the hard office and station floors he crosses daily while folding down discreetly.
Scenario three — Priya, keen walker returning to countryside routes after recovery. Priya’s hip pain flares mainly on uneven ground rather than flat pavements, and she’s looking to rebuild an active outdoor routine. The HurryCane Freedom Edition All-Terrain Cane, with its pivoting three-point base, is built precisely for the kerbs, gravel, and tree roots she’s likely to encounter.
Problem → Solution: Common Hip Pain Walking Stick Issues
Even the right stick can throw up practical snags, so here’s how to solve the ones we hear about most often.
Problem: your wrist aches after using the stick. This is almost always a height or handle-shape issue rather than a fault with the stick itself — recheck the wrist-bone measurement, and consider switching to an offset or ergonomic handle like the Vive Adjustable Offset Walking Cane or Coopers Adjustable Fischer Handle Walking Stick, both designed specifically to reduce wrist strain.
Problem: the stick slips on wet or tiled floors. Check the ferrule for wear first, since a smooth, aged tip is the single biggest cause of slips. If slipping continues even with a fresh ferrule, a flexible shock-absorbing tip such as the one on the Flexyfoot Shock Absorbing Oval Handle Folding Walking Stick genuinely improves grip on hard, smooth surfaces.
Problem: you keep forgetting the stick or it falls when propped against furniture. A self-standing design solves this outright — both the NRS Healthcare Tetrapod Walking Stick and the HurryCane Freedom Edition All-Terrain Cane are built to stand unaided, so you’re never reaching for one that’s clattered to the floor.
Problem: bending to pick things up is painful or restricted after surgery. This is precisely the gap the NRS Healthcare Freestyle Grab and Go was designed to close, combining stick and grabber so you’re never without either function.

How to Choose a Walking Stick for Hip Pain
Working through these criteria in order will get you to the right stick far faster than scrolling through endless listings.
- Confirm which hip is affected, and buy for the opposite hand. The stick is always held on the side opposite the painful joint — this single detail affects which handle style suits you.
- Prioritise adjustability over a fixed length, particularly in the first months of recovery, when your needs may still be changing.
- Match the base to your stability needs. A single ferrule suits confident, established walkers; a tetrapod or quad base suits early recovery or balance concerns.
- Consider the surfaces you’ll actually walk on. Shock-absorbing or all-terrain designs earn their price premium mainly on hard or uneven ground.
- Check the maximum user weight rating against your own weight with a sensible margin, rather than cutting it fine.
- Weigh up handle shape against hand or wrist arthritis. Ergonomic and offset handles reduce strain if grip strength or wrist pain is part of the picture.
- Factor in portability if you’re still working or travelling. A folding design matters far more than people expect once you’re carrying it through a train station.
Correct Cane Height: How to Measure It Properly
Getting the height wrong is the single most common — and most avoidable — mistake with any walking stick. The correct method: stand upright wearing your usual shoes, let your arms hang naturally at your sides, and measure the distance from the floor to the crease at the bottom of your wrist bone. That measurement is your ideal stick height.
Once set, do a final check by holding the stick as if walking: your elbow should sit at roughly a 15 to 20-degree bend, with your shoulders level and relaxed rather than hitched upward. A stick that’s too tall forces the shoulder up and can cause new shoulder discomfort on top of existing hip pain; one that’s too short pushes you to stoop forward, adding strain through the lower back and hip alike. If you switch between flat shoes and heeled shoes regularly, remember the correct height shifts with them — this is exactly why an adjustable stick, rather than a fixed wooden one, suits most people managing ongoing hip pain.
Physiotherapist Advice: Using Your Stick the Right Way
The single piece of physiotherapist advice repeated most consistently is also the one most people get wrong on their first attempt: hold the stick in the hand opposite your painful hip, not the same side. It feels counterintuitive to many first-time users, who instinctively want to lean the stick toward the painful side — but doing so actually increases compressive force through the affected joint rather than reducing it. According to Versus Arthritis, using a stick on the opposite side to a painful hip is specifically recommended to reduce weight and stress on the joint, alongside avoiding carrying heavy items on the affected side.
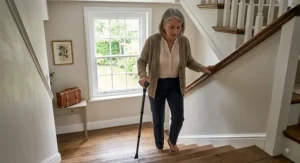
Beyond hand choice, physiotherapists typically advise moving the stick forward in step with your affected leg, rather than as a separate motion — the stick and the sore leg should land at roughly the same moment, sharing the load rather than one following the other. On stairs, the general rule taught in NHS physiotherapy sessions is “up with the good, down with the bad”: lead upward with your stronger leg, and lead downward with the stick followed by the operated or painful leg. If you’re recovering from hip replacement specifically, your physiotherapy team will usually guide you through a staged progression from frame or crutches down to a single stick over several weeks, and it’s worth sticking closely to that individualised timeline rather than rushing ahead based on how you feel on a good day.
Common Mistakes When Buying a Walking Stick for Hip Pain
Even well-intentioned buyers trip up on a handful of recurring errors. The most frequent is buying based on height alone rather than measuring properly — a stick that “looks about right” standing in a shop is rarely correctly sized once you’re actually walking with it. Close behind is ignoring the ferrule: buyers focus heavily on handle comfort and virtually never consider the tip, despite it being the single part in constant contact with the ground and the first thing to wear out.
Another common misstep is choosing a fixed-length wooden stick without considering how footwear changes affect fit — swapping slippers for outdoor shoes with even a modest heel shifts the ideal height by more than people expect. Buyers managing hip osteoarthritis specifically sometimes default to the cheapest basic stick without realising an offset or ergonomic handle could meaningfully reduce wrist strain for a similar price. Finally, many people buying for hip replacement recovery underestimate how much their needs will change over six to twelve weeks, buying a single stick when a staged approach — frame, then stick, then eventually nothing — better matches how recovery actually progresses.
Walking Stick vs Other Mobility Aids
A single walking stick isn’t always the right tool, so it’s worth understanding where it sits against the alternatives.
| Mobility Aid | Support Level | Best For | Portability |
|---|---|---|---|
| Single Walking Stick | Light | One-sided hip or knee pain, general osteoarthritis | High |
| Elbow Crutches (pair) | Moderate–High | Early post-op recovery, non-weight-bearing restrictions | Moderate |
| Rollator/Walking Frame | High | Balance concerns, early days after major surgery | Low |
| Quad/Tetrapod Stick | Moderate | Transitional stage between frame and single stick | Moderate |
This comparison highlights something worth understanding early: mobility aids aren’t a single fixed choice but a progression. Someone recovering from hip replacement will typically move from a walking frame or crutches, to a tetrapod stick like the NRS Healthcare Tetrapod Walking Stick, and finally to a single stick such as the Coopers Adjustable Fischer Handle Walking Stick or Vive Adjustable Offset Walking Cane as confidence and strength return. Choosing a single stick too early skips a genuinely useful stability buffer; sticking with a frame too long can unnecessarily limit independence once you’re capable of more.
Long-Term Cost, Safety & VAT Relief
A decent walking stick is a small, one-off purchase, but the ongoing costs are worth understanding upfront. Ferrules wear out roughly every six to twelve months with regular daily use, and replacements are inexpensive, so budget for that as a genuine, if minor, running cost rather than a surprise. If you’re managing chronic hip osteoarthritis rather than a one-off recovery, it’s also worth having a second stick — one at home and one that lives permanently in the car — since forgetting a stick when you actually need it is a far more common problem than people expect.
On the financial side, many mobility aids purchased for a genuine long-term illness or disability qualify for VAT relief in the UK, meaning eligible buyers pay the pre-VAT price rather than the standard rate. According to GOV.UK guidance on VAT relief for disabled people, this doesn’t apply to temporary conditions or general age-related decline without a qualifying long-term condition, so it’s worth checking eligibility carefully rather than assuming it applies automatically. On safety, always check current price and stock availability directly on the retailer’s page before buying, since prices and offers change regularly and a listing can move in or out of stock.
Frequently Asked Questions
❓ What is the best walking stick for hip pain?
❓ Which side do you hold a walking stick for hip pain?
❓ How do I know what height my walking stick should be?
❓ Are walking sticks available on the NHS for hip replacement recovery?
❓ Do I have to pay VAT on a walking stick if I'm disabled?
Conclusion
Choosing a walking stick for hip pain isn’t really about finding the single “best” product — it’s about matching a specific design to your specific stage of recovery, your terrain, and whatever else is going on with your hands, wrists, or balance. A wooden classic or the Coopers Fischer Handle stick will comfortably cover most everyday hip osteoarthritis needs, while anyone newly discharged after hip replacement surgery will likely get more genuine value from the extra stability of a tetrapod base or the practical two-in-one design of the Freestyle Grab and Go, at least for the first several weeks.
Whichever stick you land on, the two details that matter more than brand or price are the ones easiest to get right for free: correct height, measured properly against your wrist bone, and holding it in the hand opposite your painful hip. Get those two things right, and even a modest, budget-friendly stick will outperform an expensive one that’s been set up incorrectly. Take the time to measure properly, consider where you’ll actually be walking most, and choose accordingly — your hip will thank you for it.
✨ Ready to Walk Taller, Steadier and With Less Hip Pain?
🔍 Take a closer look at any of the seven options above and check today’s price and availability before you decide. The right walking stick, set up correctly, can make a genuine difference to your comfort and confidence on every walk you take.
Recommended for You
- Offset Handle Walking Stick for Arthritis: 7 Top Picks 2026
- Adjustable Walking Stick UK: 7 Best Picks; Sizing Guide (2026)
- Wooden Walking Stick With Carved Handle: 7 Best Buys 2026
Disclaimer: This article contains affiliate links. As an Amazon Associate, I earn from qualifying purchases. If you purchase products through these links, we may earn a small commission at no additional cost to you.
✨ Found this helpful? Share it with someone else who’s dealing with hip pain! 💬🤗
